.png)
Installing and turning on the app
- From the Shopify App Store, search for Smart search bar & filters or simply type Rapid Search, scroll to the app, and click on it.
.jpeg)
2. You will be taken to the Rapid Search app page. Click on Add app and select the Shopify account you want to connect to the app to begin installing the app.
.jpeg)
3. After installation, you will always be able to find Rapid Search in the Apps section of your Shopify Store page.
.jpeg)
4. Click on Rapid Search and select an answer from the list of options that best describes your reason for installing the app.
.png)
5. Finally, on the next screen that appears, click on Enable Rapid Search to complete the installation process and begin using the app.
.png)
Custom Search Bar
You can add a smart search bar—if your store doesn’t have one—or replace the in-built search bar for your Spotify store with our customizable search bar in a matter of minutes. Here’s how:
- Scroll to Settings from your Rapid Search admin menu and click on the Custom search bar. Alternatively, you can click on Add a search bar right on the home screen.
.png)
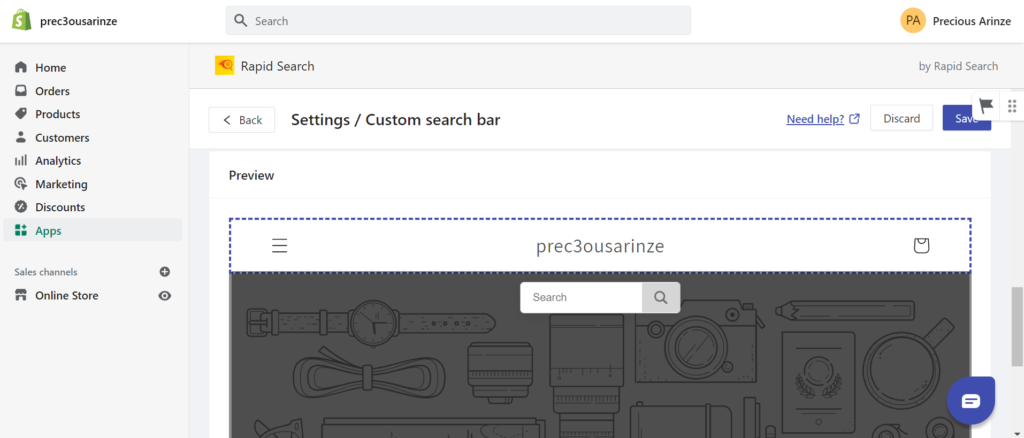
2. The Custom search bar editor will display a preview of your storefront. If you don’t see this preview immediately just type in your store password and wait for it to load. Follow the highlighted instruction and click on the element you want your search bar to appear next to.
.png)
For example, if you want it to be placed beside your cart icon, menu icon, or store name, you can click on it and the search bar will instantly show up next to it.
3. In the box above your store preview, you will find options for customizing your search bar. If you want to change the color so that it aligns with your theme or brand colors, click on Search bar colors.
You can change the color of the search icon or search button background by moving the color bar or typing a color code.
4. To change who can see your search bar, click on Search bar settings and select your preferred option.
You can adjust the position of your search bar, edit the placeholder text to say whatever you want to your customers, or even decrease/increase the width and height of the search bar.
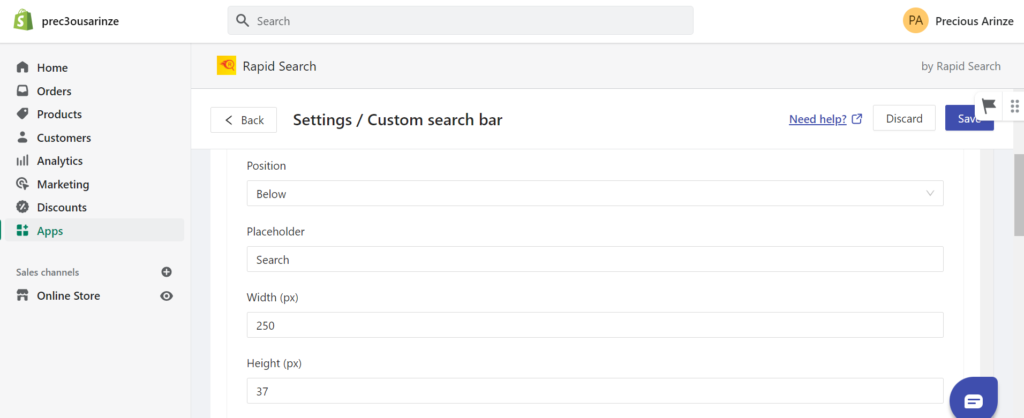
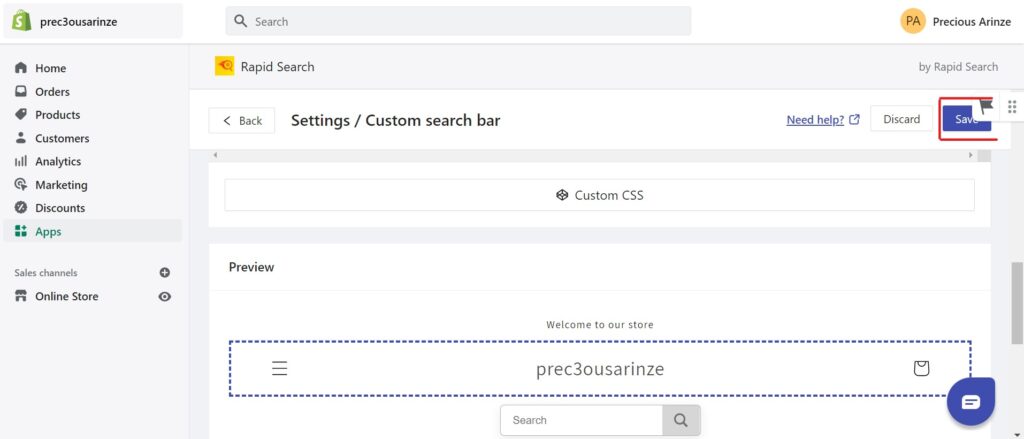
If you want your search bar to show or not show up when people visit your site on mobile or desktop devices, you can check/uncheck the appropriate box. You can also customize your search bar even further using the Custom CSS button if you have the technical skills.
5. Once you are done customizing your search bar, click Save to update your settings and make them live on your Shopify store.
General settings (Instant search menu)
The Instant search menu houses the general settings that you can use to customize your Rapid Search smart search bar. Follow these steps to configure your Instant search feature to your liking.
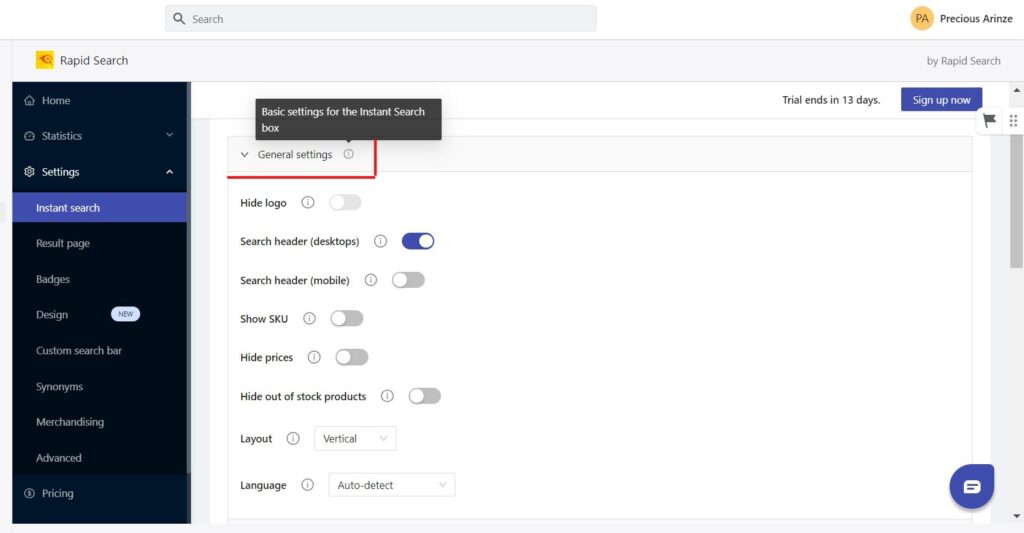
- Click on Settings > Instant Search from your Rapid Search admin menu to access the settings.
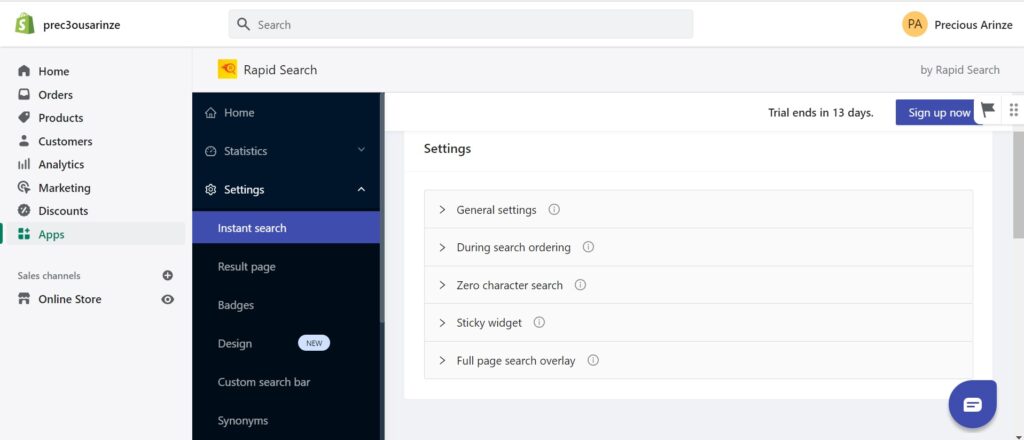
2. To change your instant search default settings, you can click on General Settings, then scroll through the options and adjust them as you see fit. If you are not sure what any of the settings mean, you can hover over the ℹ icon to get more information about what the setting does.
3. If you want to change the default number of popular suggestions, collections, pages, and products that your customers see when they begin typing words in the search bar, click on During search ordering. You can increase, decrease, or set any of the numbers to zero.

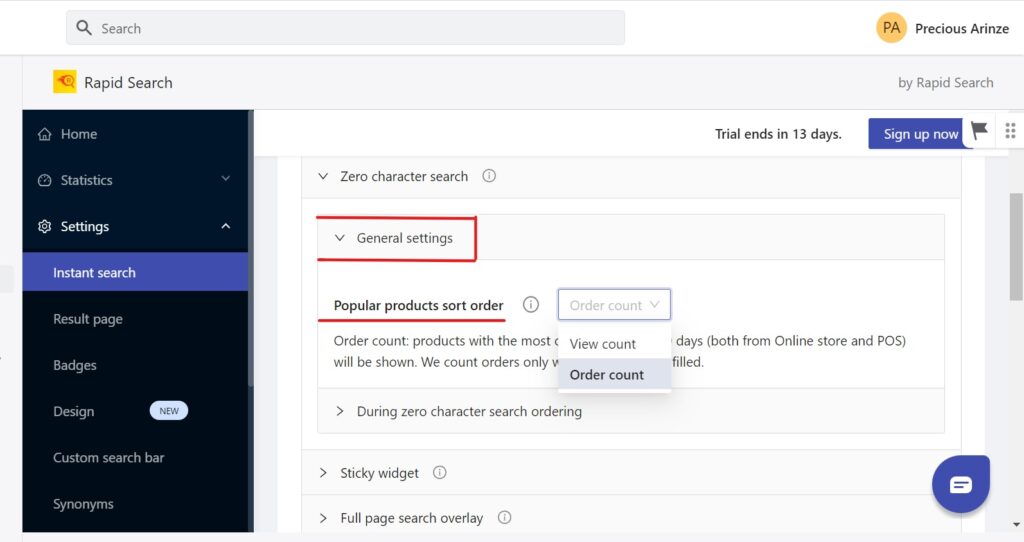
4. Click on Zero-character search to configure what shows up in your search box when a user clicks on it without typing anything. Rapid Search automatically offers 5 product suggestions and 5 popular suggestions that your customer can browse based on your store’s most searched keywords and most popular products in the last 30 days.

You can increase or decrease these numbers by tapping During zero character search ordering.

If you want your popular products to be sorted according to number of orders, rather than views, click on General settings and select Order count instead.
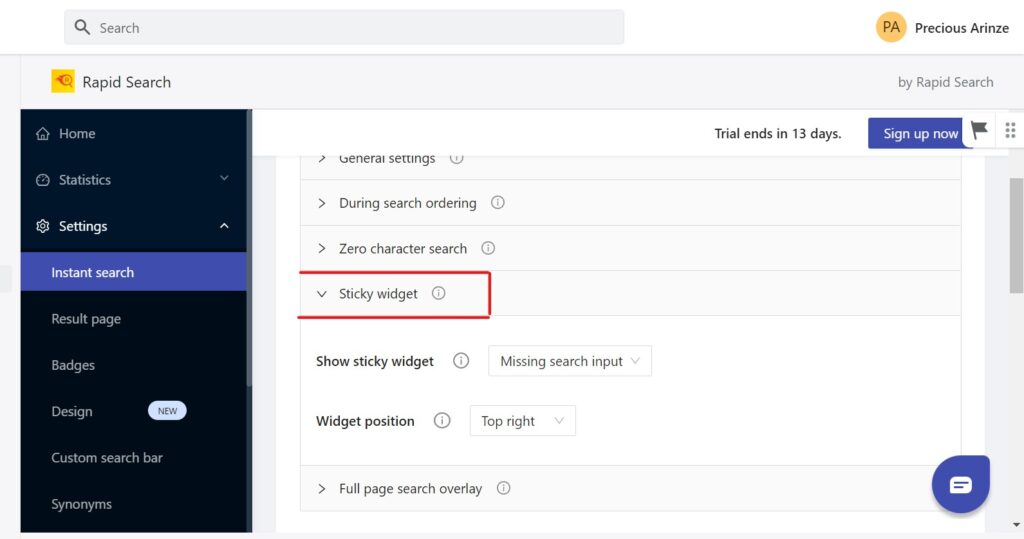
5. If your Shopify theme doesn’t support a search bar or you have no space to add one, a sticky widget can come in handy. It stays in one position where visitors can always see it as they scroll up and down the page. You can choose if or when you want this widget to appear and where it should be placed using the Show sticky widget and Widget position fields.
6. If you want to Show search overlay any time someone clicks on a search icon or bar on your Shopify store or only when they click on the sticky widget, tap on Full page search overlay to make the switch.
You can click on the Search input placeholder to change your text to something other than the default “Search”.
.jpeg)
7. Preview how any of these settings will look on your store during search or during zero character search by scrolling to the bottom of the page. To see how it will look on mobile, click on the icon at the top-left of the screen.

Customizing the design (Design)
Rapid Search recently added new Design settings to the app, giving you ample room to transform the default colors to match the theme of your store. So what are these design settings and how can you customize them?
1. Scroll down the Rapid Search admin menu and click on Settings > Design to open the editor.
2. You will be shown multiple settings options that you can tweak.
3. Click on the Instant search colors field to change the colors of your price, price hover, item hover, original price, and original price hover elements for Instant search. You can use the color bar, enter a HEX color code, or the RGB equivalent to switch to a color of your choice.
4. You can optimize the colors for your product title, product title hover, price, price hover, original price, and original price hover elements that show up on your results page by clicking on Search results page colors.
5. Tap on the Badge colors field to change the background and font color for new, discount, in stock, low stock, and out-of-stock badges.
6. To change the background and icon color of your sticky widgets, click on the Stick widget colors option.
7. If you have some CSS experience, feel free to use the Custom CSS button to add more style settings and elevate the design of your store. You can also use the Instant Search preview to see what your color adjustments will look like on your store page. Once you are satisfied with your modifications, click Save to update your Design settings.
Customizing the results page (Results page)
When a visitor types something into the search box and hits Enter or selects one of the suggestions, all relevant results will be displayed on the Results page. And yes, Rapid Search gives you the freedom to modify the settings of your Results page. Here’s how:
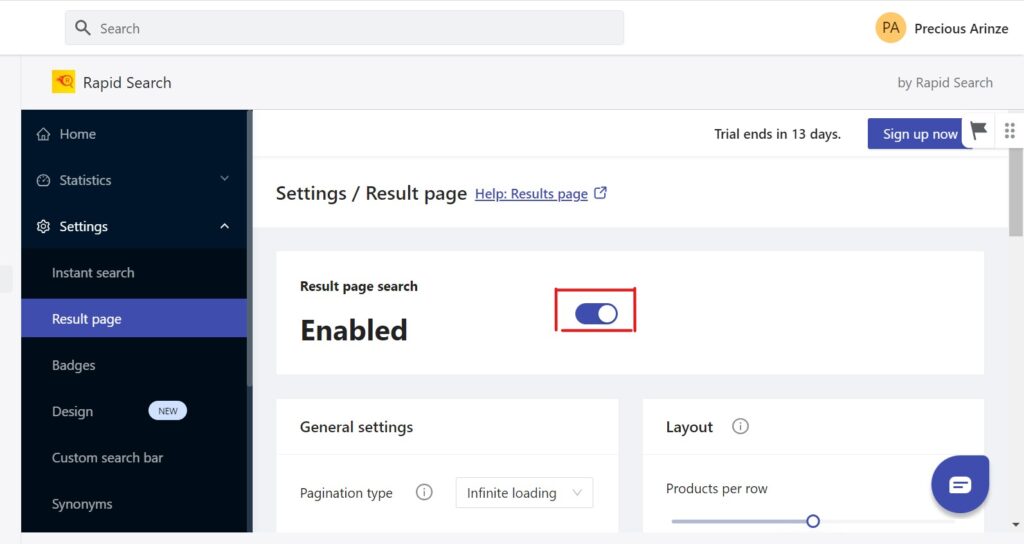
1. Select Settings > Result page from your admin menu. The result page is enabled by default, you can tap the button to disable it and re-enable it whenever you want.
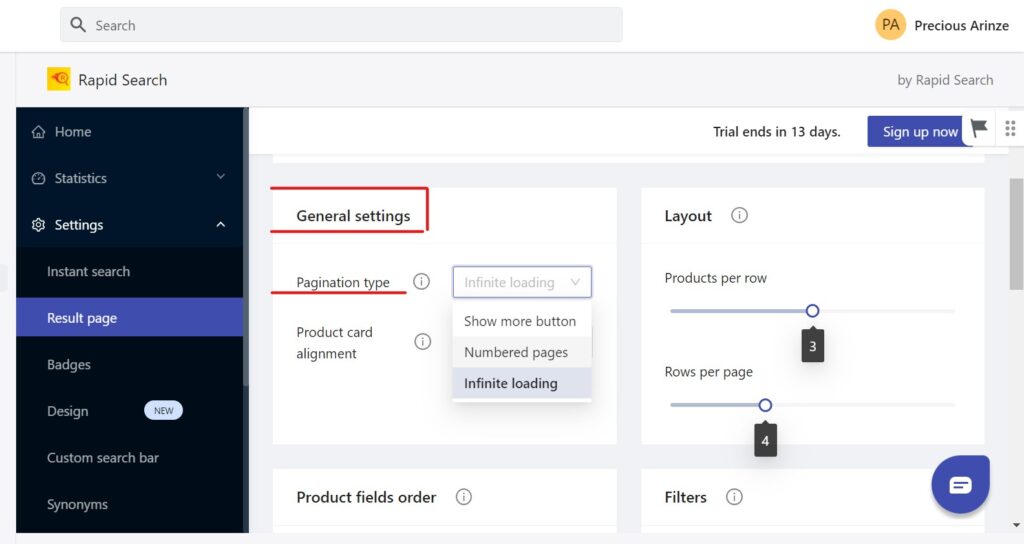
2. To begin customizing your results page, select one of the options under General settings. With the Pagination type option, you can choose how visitors will load more products on your store—by infinite loading, using numbered pages, or clicking on the show more button.
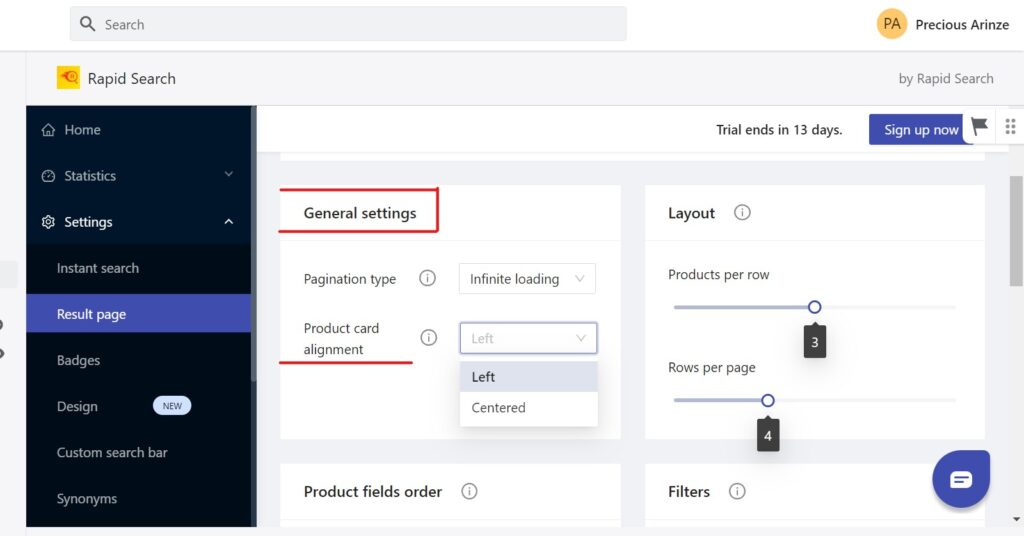
If you want to switch the positions of the product information for your product cards, tap the Product card alignment box.
3. To change the layout of Rapid Search’s result page from the default—3products per row and 4rows per page—head over to the Layout section.

4. Use the Product fields order section to decide what information you want to showcase on your product cards. You can enable the buttons for the options you want and disable those you don’t want. You can also change the order in which the information appears by clicking on the field you want to move and holding it while moving it to your preferred position.
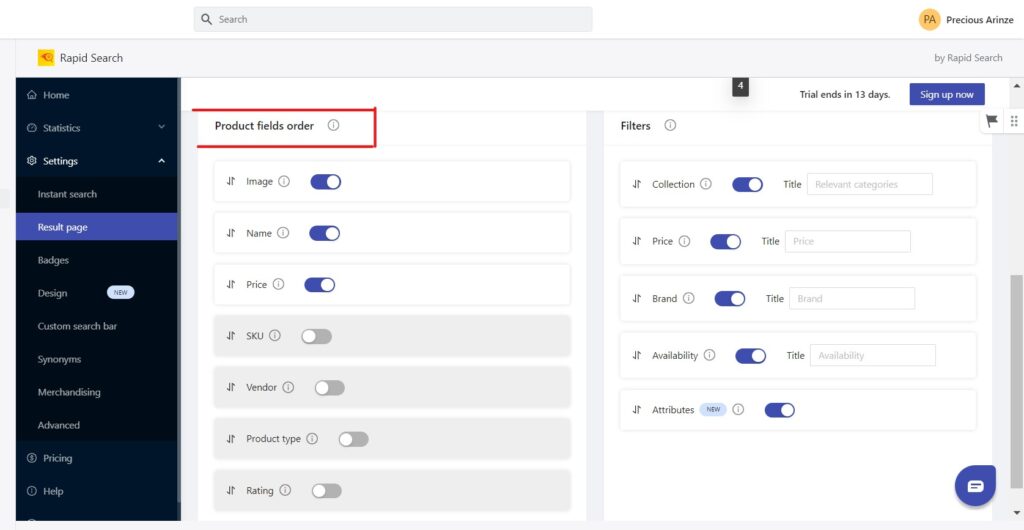
5. If you are on one of our paid plans, you get to enjoy the Filters function. Under this section, you can select which filters you want visitors to use in sorting their search results: Collection, Price, Brand, Availability, or Attributes.

Setting up Synonyms (Synonyms)
Sometimes your visitor might enter a search term for a product that you have but isn’t listed using the exact words they typed. Adding synonyms to your Rapid Search bar will prevent such searches from turning up no results.
Instead, it will display results for products that have the same or nearly the same meanings as the search query, thereby increasing the chances of them buying something rather than walking away empty-handed. Here’s how to set up synonyms from your Rapid Search admin menu:
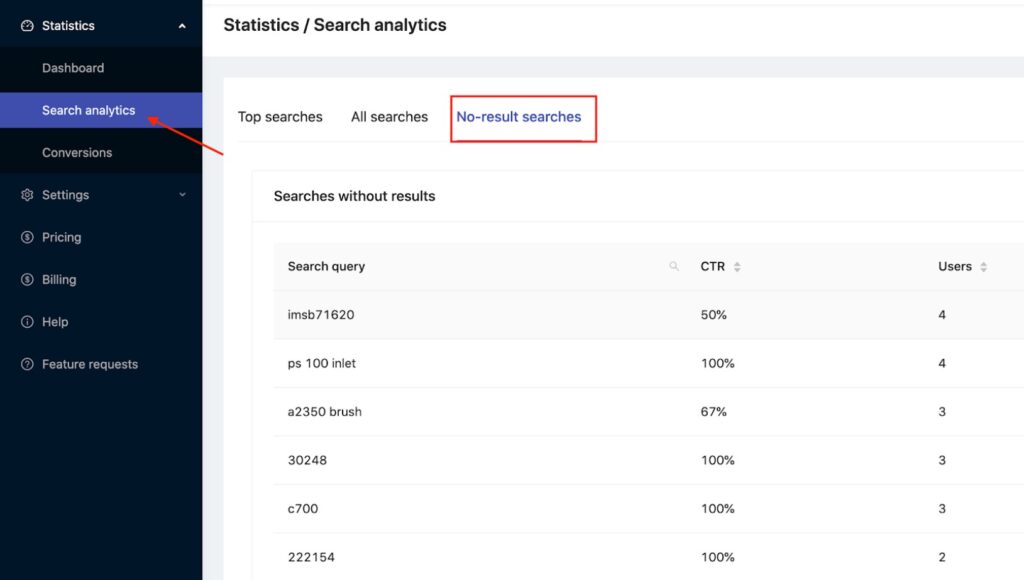
1. To save you the time and trouble of thinking about or searching for synonyms that are relevant to your store and products, click on Statistics > Search analytics > No-result searches. This will show you a list of search terms that returned no results because you didn’t have the item or the products were listed under a different name in your store.
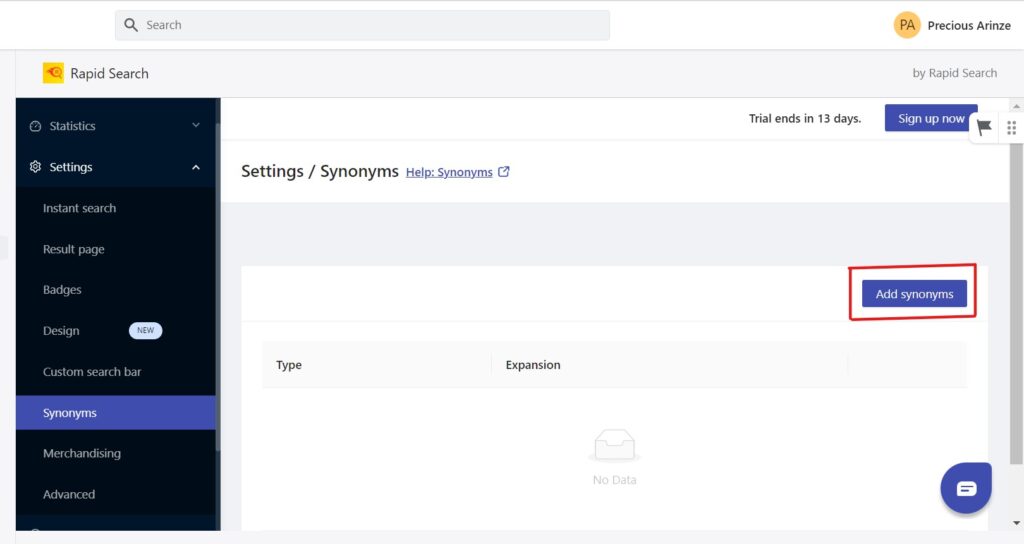
2. Add the search terms you found to your Rapid Search settings by tapping on Settings > Synonyms and clicking the Add Synonyms button.
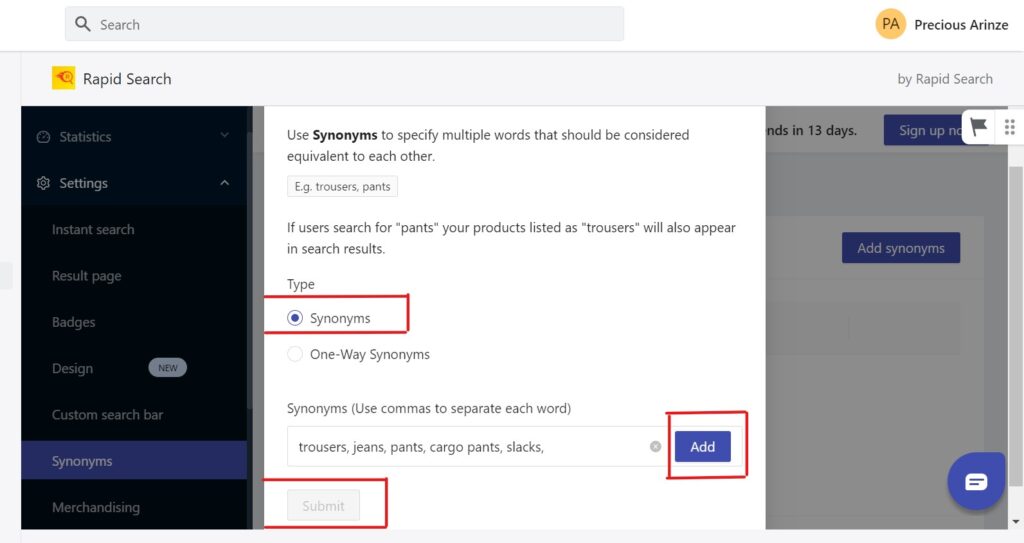
3. Under the Type section, select Synonyms, then scroll to the Synonyms box and begin typing synonyms/search terms. Click the Add and Submit buttons when you are done.
4. You can also select One-Way Synonyms as the Type, enter the relevant collective term in the box below it, then add synonyms or products that fall under the collective term. This way, when someone types a collective term in place of a specific product name, Rapid search will offer results with products that belong to that collective category.

Summary
With Rapid Search, your search box can do more for your business. Our search bar gives you a lot of freedom to customize the search engine to suit your store’s needs, and as you have seen, the settings are pretty easy to configure.
Simply follow the steps we have laid out to begin using your search bar and boosting conversions. In the next article we are going to cover some of the more advanced features of Rapid Search, so be on the lookout for it. Happy selling!


